The driveway

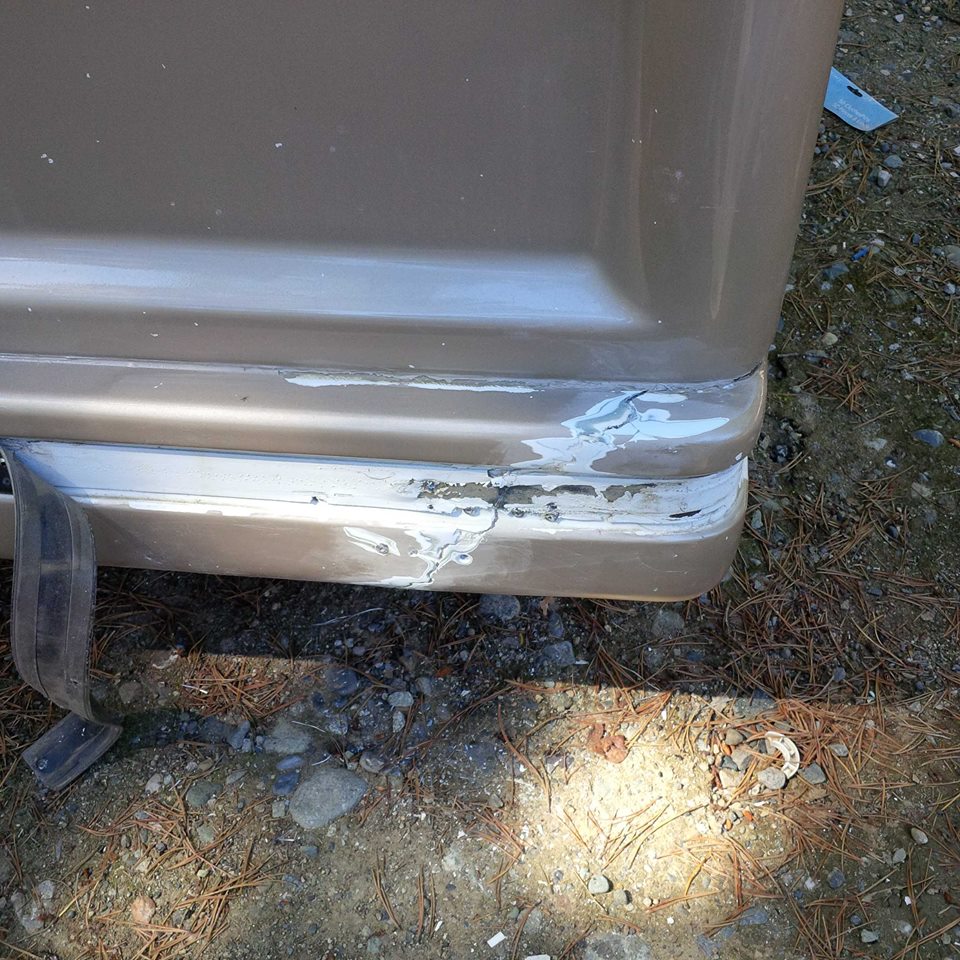
I’m still having a few issues in trying to get the driveway fixed. You can’t find an excavation contractor to come in and change the slope of the driveway before September or October.

This leaves me the choice of not taking the motorhome out of the driveway before then, or doing something else. I opted for the latter.

I figured that, if I removed the pavement from the bottom of the driveway, at least when I scrape, I’ll hit something softer rather than several inches of asphalt. This meant that I would have to rent a jackhammer and use one for the first time since I was about 17 years old.

Image.
The name is Hammer. Jack Hammer.

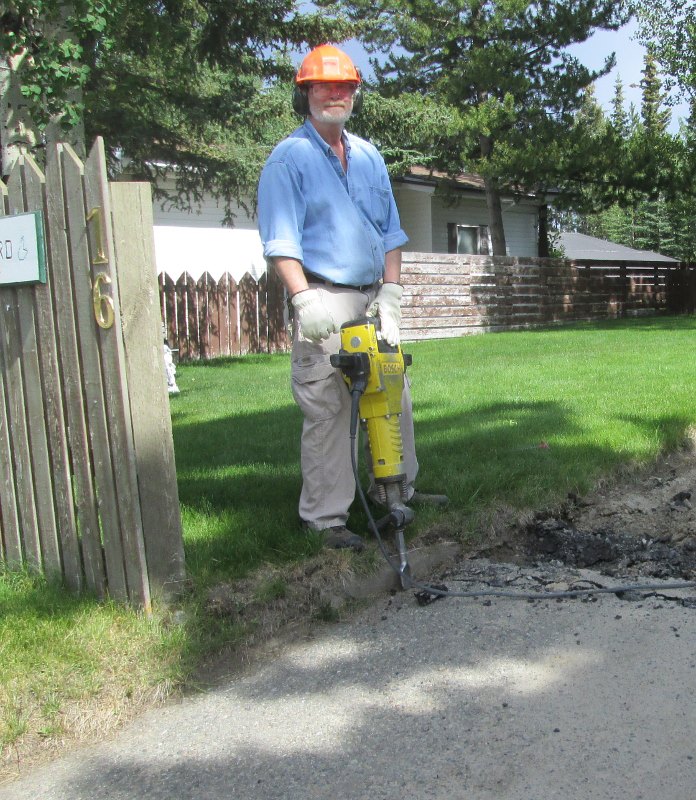
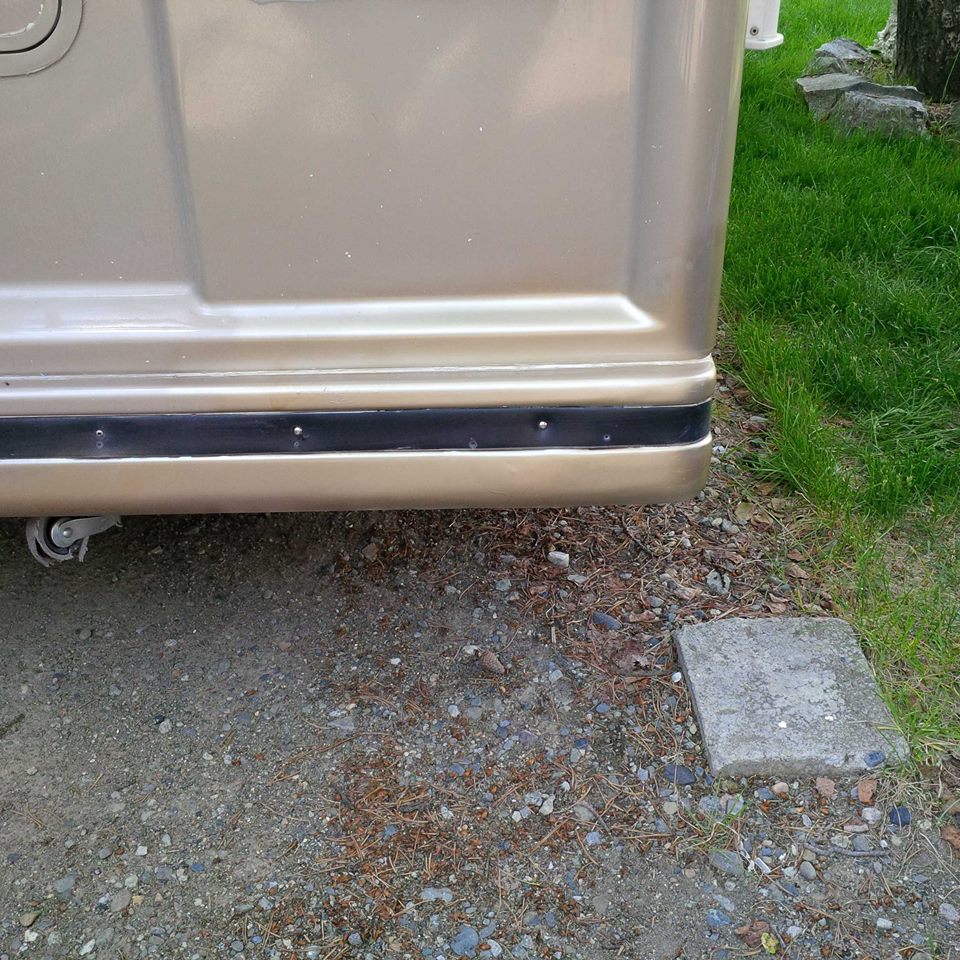
It took a little longer than I had hoped, about 3 hours of work, but I did get the pavement out. This took longer because it was 8″ thick in some places. I suspect there has been multiple patch jobs done by simply over-paving a previous bad job. Note that in part of the area I did, the asphalt was just laid down on sand, with no gravel. It isn’t hard to guess why there may have been a multitude of patch jobs done in the years previous to us buying the lot.

That being said, the job was semi-successful. I still scrape, even with extra weight on the front by putting the storage rack in the front bumper hitch and putting my 4000 watt generator on it. However, it’s a lot nicer to just scrape in gravel than the alternative…

Ouch!

I’ve mentioned before, when we bought the motorhome, I had to have part of the hump in my driveway removed. This fixed the scraping issue when we pulled out or into the driveway most of the time. But, it still occasionally scrapes.

The other day, I backed into the driveway and it scraped. When I walked around it, about 18″ of bumper was hanging on the ground. Actually, it was the fibreglass bumper cover, but it was still heartbreaking.

I started to fix it the other day, I bought a bit of aluminum bar and used it to put straps across the bumper pieces to reattach the cover. Then, with a big acetone cleanup to follow, I reinforced the bars with several layers of fibreglass cloth and resin.

Reattached bumper piece
The bumper end reattached.

Now, it was time to put on my body work hat and make it look pretty. A few days ago, I took the actual part to Canadian Tire and went through their auto touchup paint rack. I found two possible colours, one from Honda and one from Toyota, to paint over the repair. I also picked up some paintable caulking to seal the bumper when it was attached.

I filed the crack, knocking down the high points and covering where I had countersunk the screws from the repair. Sanding, cleaning and painting followed, and then replace the rubber strip that runs across the bumper.

fixed bumber
Finished job.

All in all, it turned out well. The colour isn’t exact, but in a few weeks, a little rubbing compound to feather the edges will make a big difference. Hopefully, I can get the driveway done properly and this issue becomes a thing of the past…

The camper repairs endeth…

OK. Let’s go over the checklist again.

1. Replace the copper cold water lines with PEX ones. Check.
2. Install a city water connection. Check.
3. Install the new water pump. Check.
4. Install a new ground wire for the water pump. Check.
5. Treat the tank with tank freshener. Check.
6. Go over the system for leaks. Check.

Hmm. It seems like there’s nothing left on the list. Wait. That means… wait for it… the repairs are finished. You know, finished… complete, even. In short, they’re done.

I have a few minor things to close it up. I need to install four screws and put a permanent ring connector on the new ground wire from the battery. I have to sweep and mop out the camper. But, these can wait for tomorrow morning after I make a dump run to deal with some trimmed tree limbs.

Now, the only thing I have to do is deal with this cold, freshly poured, drink of Jamaican rum. I think I’ll get on that right away…

Water, water everywhere

Well, I’m taking a hiatus from fixing the camper. I have to admit, it has been frustrating. The new tank is installed and is perfect. However, trying to repair the water lines has driven me to distraction.

I thought I finally had everything in place yesterday. I pressured the system up and had one small leaking connection. And, obviously, the nut on the compression fitting hadn’t been snugged up properly. So, I tightened it up, and no leaks! Oops, sorry, no leaks at that fitting. However, where the water line joins the hot water heater now gushes water out faster than all get out. There’s nothing quite like the spray of water under pressure.

So, I’m taking the tools out and cleaning the camper. The battery is charged and I think I’ll spend my day getting it ready to take out for a couple of days. I’ll just pack water containers and worry about getting the last connection fixed later. There are places to go, things to see, and fish to catch. I think I’d rather spend my time camping rather than fixing the camper for a little while…

No, coupler nuts are not rocket science

One would assume that something a cheap and common as coupler nuts would be easy to buy. However, when you live in a small town, and it is the long weekend, that assumption is not the best one to make.

Coupler nutsHere’s what I was looking for. They are simply longer nuts, threaded all the way through and used for a variety of purposes. The most common one is for extending threaded Readi-Rod, which, incidentally, is what I wanted them for. The new grey water tank is a little deeper than the previous one and it is supported under the camper by four threaded rods that hold two steel support straps. Since the tank is deeper, I needed to extend the support rods a few inches so the tank will be supported under the truck. However, buying them in town turned out to be a larger issue than I thought.

I went to Home Hardware which does have quite a variety of different bits and pieces for repairs. However, when I found the section where the coupler nuts were, and looked in the bin, I got quite a surprise. The bins were labelled 1/4″, 5/16″, 7/16″, 1/2″, 9/16″, and 3/4″. Wait a second. I need 3/8″ and there was no bin for them. I asked the woman working there whether or not they had that size and she was a dumbfounded as I was.

“I guess we don’t carry them, although I don’t have the faintest idea why.”

Then, it hit me. Several years ago, I replaced the black water tank with an aluminum one and had to do the same thing. Yes, I now remember going to Home Hardware and having exactly the same results, complete with the sales clerk wondering why there were no 3/8″ ones. Last time, I ended getting them at Northern Industrial Sales, but since this was the Saturday of the long weekend, I had to wait until today to get them.

Another point came up in this purchase. Home Hardware were selling the size above and below for about $4.50 each. The cost for the four of them I needed at NIS was, with GST, $1.43. So, here I sit, with a nice saving, a coffee, and four shiny, new coupler nuts, waiting for the rain to slow up a bit so I can install them….

Camper water repairs continue

The work on the camper progresses. Yes, I said “progresses.”

I took the tank to see if it could be repaired. I didn’t get the answer I was hoping for. Yes, it could be repaired but it would cost about $250 and with the amount of material fatigue, there was no guarantee that leaks wouldn’t start just by putting it in my truck and driving it home. I can take a hint occasionally and did manage to get the word, “condemned” out of that. So, I took the tank home and measured it and went off to one of the sheet metal fabricators in town with a drawing.

The estimate was a bit more than I was hoping for. However, there really wasn’t any choice. Newer tanks don’t have a drain in the center. Rather, they drain from one side or the other. The only choice is to get a new tank built and metal is the best choice. Therefore, I said to build it and bit the bullet. However, when I went to pick it up, the guy said that it wouldn’t cost as much as the quote and there was a $125 difference between the quoted price and the actual cost of the tank.

I picked up the fittings I need and now just need to do a bit of measuring and cutting the holes for the intake and vent pipes. These get a rubber grommet-style connector that the ABS pipes fit into. However, I get to agonize over cutting the holes since they have to be in the exact spots and you only get one chance to do it right. How does the saying go? “Measure nine times, cut once?”

I need to put in one more water line piece as well. It was getting late when I was working on these so I quit when I had the last one left. Oh, well. This is a good project for the morning before I start working on finishing the tank. Then, I have a little repair job to do on my mosquito vac.

Ahhh, it must be spring. I have more jobs to do than you can do in a spring and summer…